
What Is a Website Migration and How Do You Do It Without Losing SEO?
By Josh Ternyak

March 29, 2026
Website migrations are among the highest-risk events in your site's SEO history — done wrong, you can lose years of rankings overnight. This complete guide shows you exactly how to migrate safely while protecting your organic traffic.
The Event That Can Undo Years of SEO Work in a Weekend
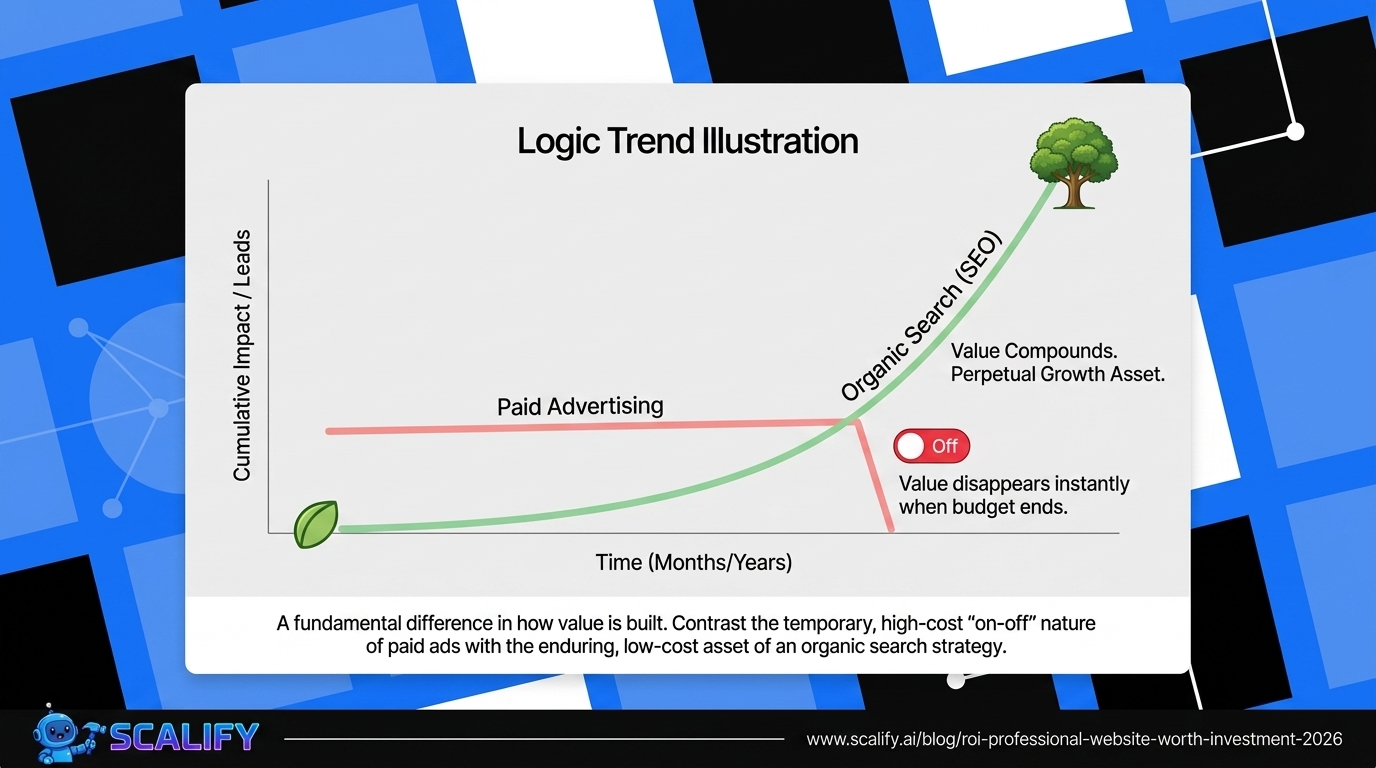
No other single event in a website's lifecycle carries as much SEO risk as a migration. A bad website migration can erase months or years of accumulated organic search equity — rankings, traffic, and the business outcomes they produce — in a matter of days. And because the damage isn't always immediately apparent (Google takes time to process site changes), businesses sometimes only discover the scale of the problem weeks later, when traffic data fully reflects the impact.
Website migrations done well, on the other hand, produce no organic traffic loss. The rankings are maintained, the indexation is clean, and the site starts its new chapter with the full SEO equity of its predecessor intact. The difference between these two outcomes isn't luck — it's preparation, planning, and systematic execution of a known set of steps.
This guide covers what a website migration is, the specific types and their relative risk levels, the complete pre-migration checklist, the execution process, and the post-migration monitoring that catches problems before they compound.
What a Website Migration Is
A website migration is any significant change to a website that affects its structure, location, or technical operation in ways that could impact search engine visibility. The term is broad and encompasses several distinct scenarios:
Domain migration: Moving from one domain to another — changing your brand name (example.com to newbrand.com), moving from a country-code TLD to a .com (example.co.uk to example.com), or consolidating multiple domains. Highest SEO risk of all migration types because every URL on the site is changing.
HTTP to HTTPS: Moving from insecure HTTP to secure HTTPS. Lower risk than domain migrations because only the protocol changes, but misconfigured HTTPS migrations can still cause significant issues.
CMS migration: Moving from one content management system to another — WordPress to Webflow, Wix to WordPress, Squarespace to custom. High risk if the CMS change also changes URL structures; lower risk if URLs are preserved.
URL restructuring: Reorganizing the site's URL architecture — flattening deep hierarchies, changing category structures, updating naming conventions. Risk level depends on how many URLs change and how much organic traffic those URLs carry.
Website redesign with CMS continuation: Rebuilding the site's design and content while maintaining the same CMS and URL structure. Lower SEO risk (URLs don't change) but still carries risks from content changes and technical configuration.
Subdomain to subdirectory: Moving blog.example.com to example.com/blog, or app.example.com to example.com/app. Moderate risk depending on the organic traffic and link equity the subdomain has accumulated.
Hosting migration: Moving the same site files from one server to another. Lowest SEO risk if done correctly (only a DNS change) — but technical errors during hosting migrations can create unexpected downtime or duplicate content issues.
Why Migrations Go Wrong: The Most Common Failure Modes
Understanding the typical failure modes helps you specifically prevent them:
Missing or incorrect redirects: The most common and most damaging migration failure. When URLs change and no 301 redirect is set up from old URL to new URL, every visitor and every search engine that tries to access the old URL gets a 404 error. Every backlink pointing to the old URL no longer passes equity to any destination. Every ranking the old URL held is lost because Google can't connect the old URL to its new equivalent. This is the migration failure that destroys traffic most comprehensively.
Redirect chains and loops: Old URL → Intermediate URL → New URL is a redirect chain — each hop in the chain dissipates link equity and slows page loading. Old URL → New URL → Old URL is a redirect loop that makes pages inaccessible. Both occur when redirect maps aren't validated before launch.
Canonicalization errors: Both old and new URLs remain accessible without proper canonical tags or redirects, creating duplicate content. Google may index either version, potentially splitting ranking equity between them or indexing the wrong version.
Robots.txt or noindex blocking: A common catastrophic accident: the staging environment has robots.txt set to block all crawlers (correct for staging), and that same robots.txt file is deployed to production. Or the new site launches with noindex tags that were correct for staging still active on production pages. Google stops indexing the site. Traffic drops to near zero.
XML sitemap not updated: The sitemap still references old URLs after the migration. Google follows the sitemap, discovers old URLs, finds they've changed, and takes longer to fully re-index the new site structure.
Content changes during migration: Changing URL structure, CMS, and content simultaneously makes it impossible to diagnose which change caused any performance drop. Migrations should change as few variables as possible simultaneously.
Internal links not updated: After a migration, internal links still pointing to old URLs trigger one redirect per internal link on every page load. This adds overhead and wastes crawl budget. All internal links should be updated to point directly to new URLs after migration.
The Pre-Migration Checklist
This is where most of the migration work happens. Thorough pre-migration preparation is what separates successful migrations from disastrous ones.
Step 1: Baseline Data Collection
Before changing anything, create a comprehensive baseline of your current site's performance. This becomes both the benchmark for measuring migration success and the input for your redirect map.
Full URL crawl: Use Screaming Frog (or Sitebulb) to crawl every URL on the current site. Export the complete URL list. This is the source of truth for every URL that needs to be handled — redirected, preserved, or intentionally retired — during the migration.
Ranking data export: Export current keyword rankings from Google Search Console (Performance → Queries, filter for last 3 months, export full data). This records what you're ranking for before the migration so you can verify rankings are preserved or diagnose losses after.
Traffic data export: Export organic traffic data from Google Analytics by page for the last 3 months. This establishes baseline traffic per page — you'll compare against this post-migration.
Backlink data: Export your backlink profile from Ahrefs or Semrush. Specifically, which URLs have external links pointing to them? These URLs are the highest priority for redirect mapping — their backlink equity must be preserved through proper redirects.
Core Web Vitals baseline: Record current Core Web Vitals scores from Google Search Console's Core Web Vitals report and PageSpeed Insights. You want to maintain or improve performance, not inadvertently regress it.
Step 2: Build the Redirect Map
A redirect map is a document (typically a spreadsheet) that maps every old URL to its new destination URL. This is the most labor-intensive part of migration preparation and the most critical.
For every URL on the current site, determine:
Same content, new URL: The old URL maps to the new URL for the same content. This is a 1:1 redirect. 301 redirect from old URL to new URL preserves ranking equity.
Merged content: Two old pages are being combined into one new page. Both old URLs redirect to the single new page. Content consolidations handled this way preserve the equity of both source pages.
Removed content: Content being deleted without a logical equivalent. The old URL should redirect to the most relevant remaining page (category page, homepage) rather than serving a 404. 301 to a relevant destination is better than a 404 for link equity preservation.
URL structure changes: For migrations where URL structure changes systematically (e.g., adding /blog/ prefix to all blog posts), redirect generation can be automated — you're applying the same transformation rule to every URL rather than mapping individually.
Priority URLs for redirect mapping: pages with significant organic traffic, pages with significant backlinks, pages that rank for valuable keywords. These are the URLs where a missing redirect causes the most damage.
Step 3: Build and Test the New Site on Staging
The new site should be built on a staging environment before any live migration begins. The staging environment should:
- Be on a separate domain or subdomain from the live site
- Have all robots.txt disallow (block all crawlers) or noindex tags on all pages — preventing Google from indexing staging content
- Have the redirect map fully implemented — even though staging is noindexed, testing redirects on staging before launch is critical
Staging QA checklist:
- Test every redirect in the redirect map — use a redirect checker tool or browser developer tools to verify each redirect returns a 301 and goes to the correct destination
- Verify no redirect chains — check that no redirect goes through more than one hop
- Verify no redirect loops
- Run axe DevTools accessibility scan on key templates
- Test all forms and key user flows
- Run Google PageSpeed Insights on key pages and verify performance is equal or better than current site
- Check that structured data is implemented correctly with Google's Rich Results Test
- Verify the sitemap exists and contains only intended URLs
Step 4: Pre-Launch Technical Preparation
Immediately before launch:
- Lower TTL (Time to Live) on DNS records to 300 seconds (5 minutes) — 48 hours before launch. This ensures DNS changes propagate quickly when made.
- Prepare the robots.txt file for the new site — not the staging version that blocks crawlers
- Prepare Google Search Console property verification for the new domain/URL (if changing domains)
- Prepare your Google Analytics configuration for the new URL structure
- Coordinate the launch with stakeholders and make sure the right people are available to monitor and respond to issues
The Migration Launch
Don't launch Friday afternoon. Launch early in the week (Monday or Tuesday), early in the business day, when your full team is available for monitoring and response. Problems discovered on Friday afternoon go unfixed over a weekend.
Launch sequence:
1. Deploy the new site files to production (or point the DNS to the new hosting)
2. Verify the live site is serving HTTPS correctly
3. Verify robots.txt is correct for the live environment (not blocking crawlers)
4. Verify that noindex tags from staging have been removed from production
5. Test 10–20 sample redirects from the redirect map to verify they're working in production
6. Test key user flows (contact form, checkout if e-commerce)
7. Submit the updated sitemap to Google Search Console
8. For domain migrations: configure the domain change in Google Search Console's "Change of Address" tool
9. Monitor Google Search Console's Coverage report for the next 48 hours — look for unexpected crawl errors
Post-Migration Monitoring
The migration isn't complete when the site is live. The post-launch period requires active monitoring to catch problems before they compound:
Days 1–3: Check Google Search Console's Coverage report daily. Look for sudden increases in 404 errors (missing redirects) or 301/302 redirect counts. Verify that Google is able to crawl and is beginning to index new URLs. Monitor organic traffic in GA4 for any immediate dramatic drops.
Week 1: Check organic traffic and rankings daily. Some fluctuation is normal as Google reprocesses the site. A complete collapse of traffic is an emergency requiring immediate investigation.
Weeks 2–4: Continue monitoring organic traffic trends. For significant domains, full Google reprocessing can take 3–6 weeks — some ranking volatility during this period is normal. Compare week-over-week trends rather than panicking at daily fluctuations.
Month 1–3: Compare organic traffic against pre-migration baseline. A well-executed migration should show traffic equal to or greater than pre-migration levels within 2–3 months. Persistent significant drops after 3 months indicate unresolved issues requiring investigation.
What to do if traffic drops significantly: Check for missing redirects on high-traffic pages. Verify robots.txt and noindex issues haven't crept back in. Check if Google is indexing the right URLs (inspect URLs in Search Console). Check if internal links have been updated to new URLs. Verify that canonical tags are correctly implemented.
Special Case: Domain Migrations
Domain migrations are the highest-risk migration type because every URL on the site is changing simultaneously. In addition to the standard migration checklist:
Google's Change of Address tool: In Google Search Console, use the Change of Address tool (under Settings) to formally notify Google of the domain migration. This helps Google associate the new domain with the old one's history more quickly than natural crawling would allow.
Backlink outreach: For your highest-value backlinks (those from highly authoritative, relevant sites), reach out to the linking sites and ask them to update their links to point directly to the new URLs rather than relying on redirects. Direct links pass more equity than redirected links.
Social media and offline profile updates: Update your website URL everywhere it appears — email signatures, social media profiles, business directories, Google Business Profile, LinkedIn, etc.
Longer recovery timeline: Domain migrations typically take longer to fully recover in Google than same-domain migrations. 3–6 months for full equity transfer is normal. Some sites see temporary ranking dips during this period that recover as Google fully processes the change.
The Bottom Line
Website migrations are high-risk events that can destroy years of SEO work — or preserve it completely, depending on how systematically the preparation is done. The key ingredients: comprehensive pre-migration data collection, a complete and tested redirect map, thorough staging QA, a monitored launch, and active post-launch tracking.
None of the individual steps is particularly complicated. What makes migrations go wrong is skipping steps — incomplete redirect maps, untested staging configurations, insufficient post-launch monitoring. Do the preparation systematically and the migration protects everything you've built.
At Scalify, we treat SEO preservation as a core requirement in every site rebuild — existing rankings and organic traffic are assets we're responsible for protecting, not casualties of the design process.


.jpeg)

.jpeg)


78 SW 7th St, Miami, FL 33130